Soldering Techniques
Tinning the Tip
In this guide, we introduce the basics of soldering, with a focus on THT soldering (Through-Hole Technology), as it's the ideal starting point for beginners and is used in most DIY projects involving through-hole components.
Once the soldering iron has reached around 350°C, begin by tinning the tip with a small amount of solder. Simply touch the solder to the tip until it melts and flows evenly around it.
Repeat this process before and after each soldering session. This not only improves the quality of your solder joints but also extends the lifespan of the tip.
How to Solder
Start by placing the component into the designated holes and securing it by gently bending the legs sideways at about 45°. Avoid over-bending, as this can stress or even break the leads and make future desoldering more difficult.
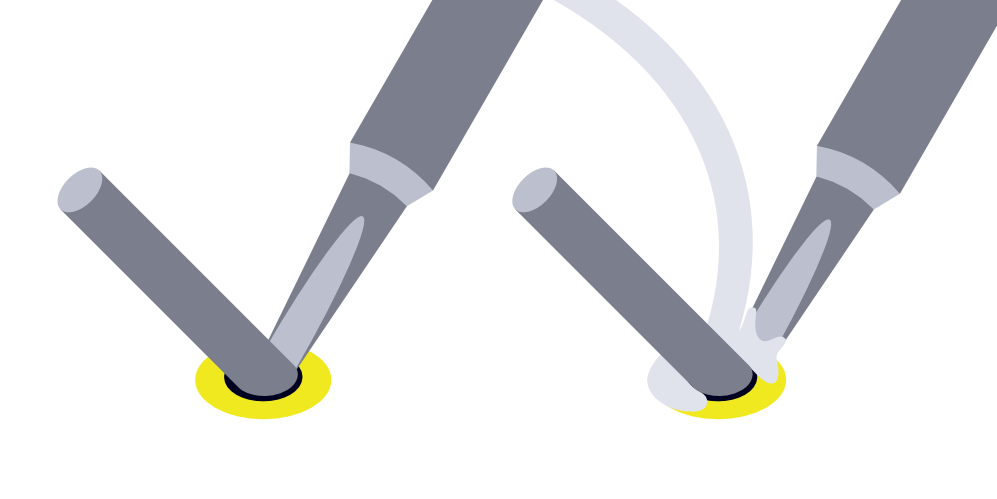
Next, turn the PCB over to begin soldering. Heat the component leg and the copper pad simultaneously by touching both with the tinned tip. Roughly after 1-2 seconds, the pad should be hot enough. Now apply solder to the joint.
How long it takes to heat a solder joint depends on your soldering iron, the tip, and how you hold it. But it also depends on what kind of traces are connected to that solder pad. If it's connected to a GND plane, soldering can take much longer. If a longer heating time is required with solder already applied, add a small amount of fresh solder shortly before finishing the process. This will also apply fresh flux and ensure that the solder joint becomes smooth.
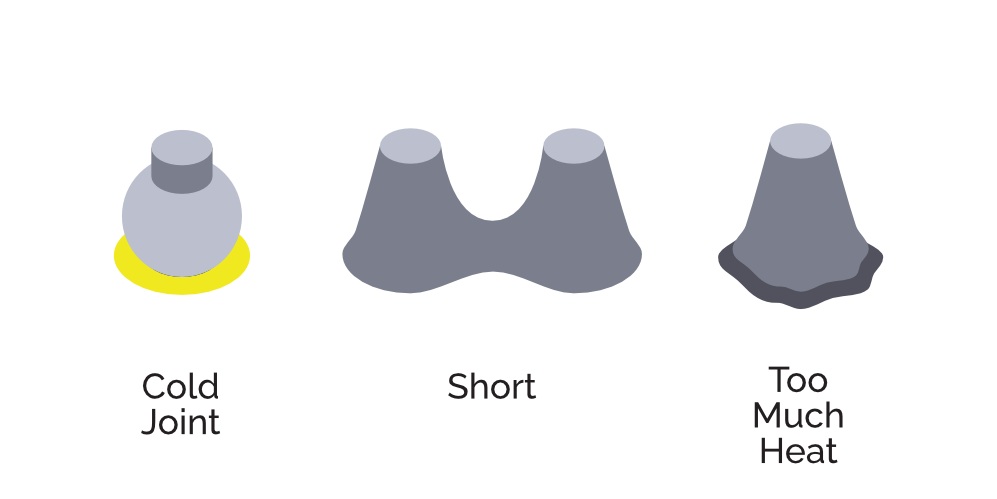
Only apply solder to the component leg or the copper pad—never directly to the iron. The component must be hot enough to melt the solder on its own. If the joint is too cold, it will result in a poor connection.

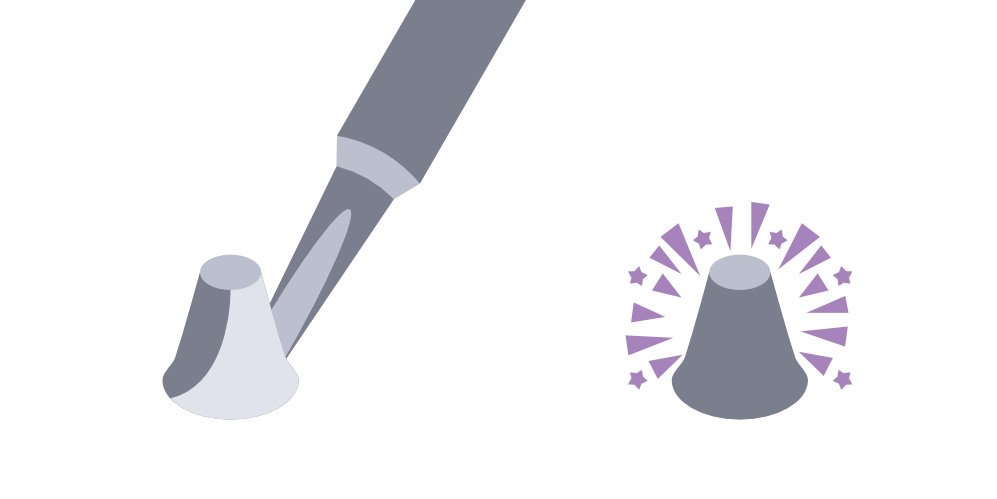
The final step is to wait a few seconds to let the joint cool down.
Then you can cut off the legs with a Plier as close to the board as possible without damaging it.

A good solder joint is volcano- or cone- shaped and appears shiny and smooth. Don’t apply too much solder. You want to avoid solder balls or overflow into nearby holes, as this could cause a short circuit and potentially damage your project.
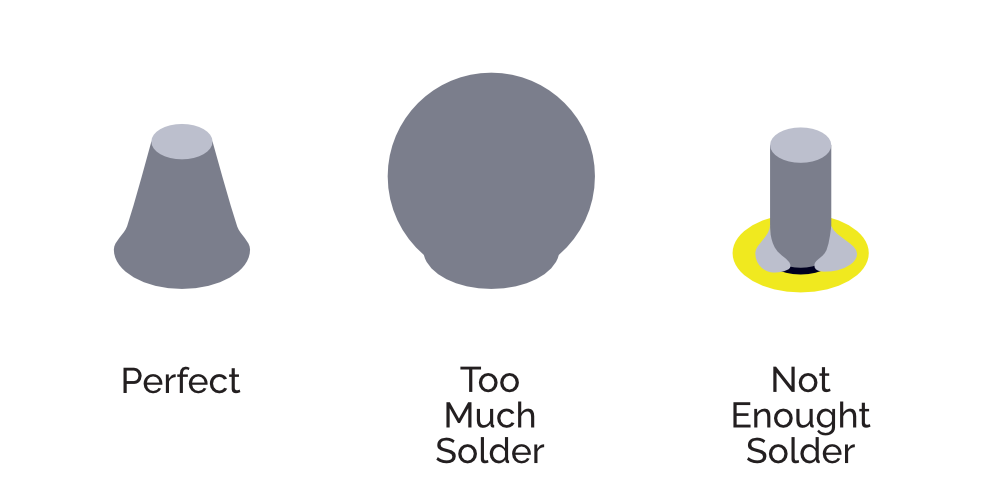
If the solder joint doesn't look optimal, you can often reheat the joint with the iron plus add a tiny bit of fresh solder incl. flux. The solder will reflow and settle into a better shape.
If excess solder remains or if it bridges to a nearby pad, you can remove it usingdesoldering braid or a solder sucker.
Cleaning the PCB
After you’ve finished soldering all components to the PCB, it’s good practice to clean the board using isopropyl alcohol.
These guides are part of our effort to share practical knowledge about DIY synth building, tools, and Eurorack standards. We want them to be as clear and useful as possible, and we know there’s always room for improvement.
If you spot an error, think something could be explained better, or want to share your own DIY tips, please let us know. You can reach us at shop@exploding-shed.com or through our contact page .
Soldering Techniques
Tinning the Tip
In this guide, we introduce the basics of soldering, with a focus on THT soldering (Through-Hole Technology), as it's the ideal starting point for beginners and is used in most DIY projects involving through-hole components.
Once the soldering iron has reached around 350°C, begin by tinning the tip with a small amount of solder. Simply touch the solder to the tip until it melts and flows evenly around it.
Repeat this process before and after each soldering session. This not only improves the quality of your solder joints but also extends the lifespan of the tip.
How to Solder
Start by placing the component into the designated holes and securing it by gently bending the legs sideways at about 45°. Avoid over-bending, as this can stress or even break the leads and make future desoldering more difficult.

Next, turn the PCB over to begin soldering. Heat the component leg and the copper pad simultaneously by touching both with the tinned tip. Roughly after 1-2 seconds, the pad should be hot enough. Now apply solder to the joint.
How long it takes to heat a solder joint depends on your soldering iron, the tip, and how you hold it. But it also depends on what kind of traces are connected to that solder pad. If it's connected to a GND plane, soldering can take much longer. If a longer heating time is required with solder already applied, add a small amount of fresh solder shortly before finishing the process. This will also apply fresh flux and ensure that the solder joint becomes smooth.
Only apply solder to the component leg or the copper pad—never directly to the iron. The component must be hot enough to melt the solder on its own. If the joint is too cold, it will result in a poor connection.
The final step is to wait a few seconds to let the joint cool down.
Then you can cut off the legs with a Plier as close to the board as possible without damaging it.
A good solder joint is volcano- or cone- shaped and appears shiny and smooth. Don’t apply too much solder. You want to avoid solder balls or overflow into nearby holes, as this could cause a short circuit and potentially damage your project.
If the solder joint doesn't look optimal, you can often reheat the joint with the iron plus add a tiny bit of fresh solder incl. flux. The solder will reflow and settle into a better shape.
If excess solder remains or if it bridges to a nearby pad, you can remove it usingdesoldering braid or a solder sucker.
Cleaning the PCB
After you’ve finished soldering all components to the PCB, it’s good practice to clean the board using isopropyl alcohol.
These guides are part of our effort to share practical knowledge about DIY synth building, tools, and Eurorack standards. We want them to be as clear and useful as possible, and we know there’s always room for improvement.
If you spot an error, think something could be explained better, or want to share your own DIY tips, please let us know. You can reach us at shop@exploding-shed.com or through our contact page .